
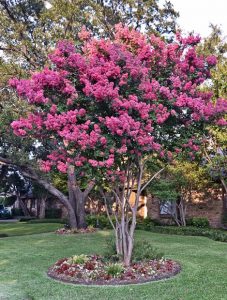
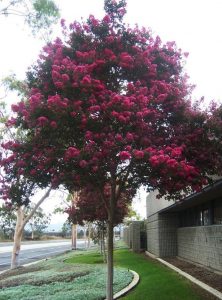
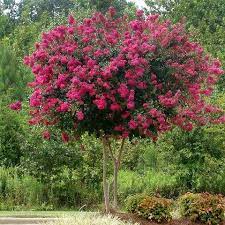
Many people think that the crape myrtle tree is somewhere between a shrub and a tree, so it is often misunderstood and therefore not well cared for. However, with proper care, this beautiful and hardy flowering tree of crape myrtle can be an eye-catching addition to the landscape.
Although native to South Asia, crape myrtle has been cultivated in North America since the 18th century. Crape myrtle is essentially a multi-stemmed shrub that has been bred into many different species and subspecies, each with its own unique characteristics. The most common species in North Texas is the crape myrtle, which produces multi-colored flowers. When allowed to grow, this crape myrtle can reach a height of about 20 feet and a width of about 20 feet. Other crape myrtle varieties may exhibit different growth patterns and sizes when mature.
Basic care of crape myrtle
Crape myrtle trees are valued for their hardiness, low maintenance, and colorful blooms. Crape myrtle can thrive in a variety of soil types, such as the alkaline dark clay found in much of north Texas. Crape myrtle is also drought tolerant but prone to overwatering or poor drainage.
In addition to proper pruning and removal of dead plant debris in the gaps between stems, crape myrtle can often benefit from fertilization and may require professional care if common health problems develop. Fortunately, there are few common crape myrtle health problems that pose a serious threat to the tree’s survival. Often just careful pruning will keep crape myrtle healthy and vigorous for decades.
The crape myrtle bark is thin and sheds throughout the year. Therefore, crape myrtle is easily damaged by lawnmowers, lawnmowers, and other activities. Planting a ground cover other than turfgrass around the crape myrtle, along with an appropriate mulch, can provide a cushion to protect the stems and roots.
Crepe Myrtle Care: Pruning!
Because of the often overwhelming growth habit of crape myrtle, many people are very aggressive when it comes to pruning. Don’t succumb to this desire to cut crape myrtle to the ground in late fall.
If you do, thin, unsightly new shoots will grow from the ugly stump in spring. Use common sense and cut off the top 2 or 3 feet of the branches before spring arrives. Do this carefully with pruning shears or secateurs, not an electric hedge trimmer.
Be sure to trim the crape myrtle side branches evenly so there are no ugly, stubby stumps sticking out. Cutting smoothly along the trunk, branches, or trunk creates a more beautiful silhouette and helps protect your tree from disease.
How to prune small crepe myrtle?

Not pruned properly…the shrub can get ugly. Steve Bender (aka “The Grumpy Gardener”) even held a contest about bad tailoring, which local wholesalers dubbed “Murder on the Crepes.”
It’s always good to get opinions from multiple experts. To complement Steve’s tutorial, Gardenality’s Brent Wilson also has a great tutorial.
Brent talks about not allowing “peer pressure” from neighbors to start pruning prematurely. “The best time to prune crepes is late winter or early spring—just before new growth emerges,” says Brent.
He also provides some nice graphics on pruning best practices.
Planting Crepe Myrtle Saplings Successfully
When growing store-bought crape myrtle seedlings, follow these steps to ensure success.
1.Choose the right time. If you live in the tropical south, you can grow crape myrtle year-round. If you live in a frost area, consider planting in early spring.
2.Keep it sunny! The more sunlight, the better the crape myrtle tree.
3.Cultivate the soil properly. Test the pH of the soil. If it’s between 6.0 and 7.3 everything is fine. Your crape myrtle likes slightly acidic soil. To lower the pH, you should mix in some manure, compost, or other organic matter. To increase the pH, add some farm lime.
4.Prepare your planting site. As with any seedling, your young tree will thrive if you till the soil thoroughly before planting. All trees need well-drained, loose soil for good root growth. Add garden sand or peat moss to heavy clay soil.
5. Make sure you have enough root space. After you have plowed where you plan to plant the tree, dig a wide hole. It should be fairly wide, but no deeper than the depth of the pot the seedling is in. Be careful not to plant the seedlings too deep, as the soil around the root ball should be well oxygenated.
6.Surround your seedlings with good quality soil. Once your seedlings are in place, backfill the hole with well-cultivated, properly tilled soil. Compact the soil to hold the seedling in place, but don’t apply enough pressure to compact it. Again, the soil around young trees needs to be well-lit, loose, nutrient-rich, and well-ventilated.
7. Add a layer of mulch. After planting, it’s best to apply a thick layer of mulch to retain moisture and nutrients. 3 to 5 inches of wood mulch is a good idea. Be careful not to let it touch the trunk of the young tree, as this can cause rot. It’s a good idea to add a few inches of mulch each spring.
8.Give your young tree something to drink. Water young shoots thoroughly immediately after planting. Wet the leaves, trunk, and branches, then apply a drop of water to the roots for about an hour to ensure the soil is completely soaked. Keep an eye on your seedling and give it a good drink of water whenever it shows signs of discomfort, such as wilting leaves. Otherwise, drink a good strong drink once a week.


